Version 1.0 - Last Updated: 19 May 2023
Learning Centre Portal user guide
A guide to help you use the Learning Centre Portal.
Getting started
How to access the Learning Centre Portal
You can access the Learning Centre Portal through an internet browser. The portal supports Microsoft Edge, Firefox, Safari and Chrome. It does not support Opera.
To go to the portal, go to http://www.learningcentre.uk.com or select the Sign into the Learning Centre Portal button at the top of this page.
How to sign into the Learning Centre Portal
- Go to http://www.learningcentre.uk.com or select the Sign into the Learning Centre Portal button at the top of this page. This will open the portal sign in page.
- Enter your username and password and select Sign in. This will take you to the portal Home page.

Signing in for the first time
When you register as a Learning Centre Portal user, we’ll give you a username and a system generated password. When you first sign into the portal, you’ll need to change this password.
Creating a new password that only you know helps to keep your account safe.
Your password must be at least 10 characters long. It needs to contain:
- at least one number
- a mixture of upper and lower case letters
- a special character
How to reset your password
If you’ve forgotten your password, you can reset it yourself as long as you know your username.
- Go to http://www.learningcentre.uk.com or select the Sign into the Learning Centre Portal button at the top of this page.
- On the Learning Centre Portal sign-in page, select Forgot your password?

- Enter your username and select Reset my password. You will then get an email telling you how to reset your password.

Home page
Home page of the portal
The portal Home page is the first page you’ll see after signing in.

On the left side of the page is a menu bar. Select Home from the menu bar to view the following Home page headings:
- messages
- downloads
- reports
- contacts and links
Select each heading to expand it.
There is more detailed information about the Home page elements in the following chapters of this user guide.
New Approved Applications indicator
At the top of the Home page, you’ll find the New approved applications indicator. This lets you quickly find any EMA Learning Agreements that need signing.
If you see a number next to the indicator, select the number. This will take you to a list of students who need to sign their EMA Learning Agreements.

New unconfirmed bonus links
At the top of the homepage, you’ll find links to ‘Unconfirmed January Bonus’ and ‘Unconfirmed June Bonus’.
If you see a number next to the indicator, select the number. This will take you to the Bonus Worklist and show you all applications where you need to confirm a bonus.
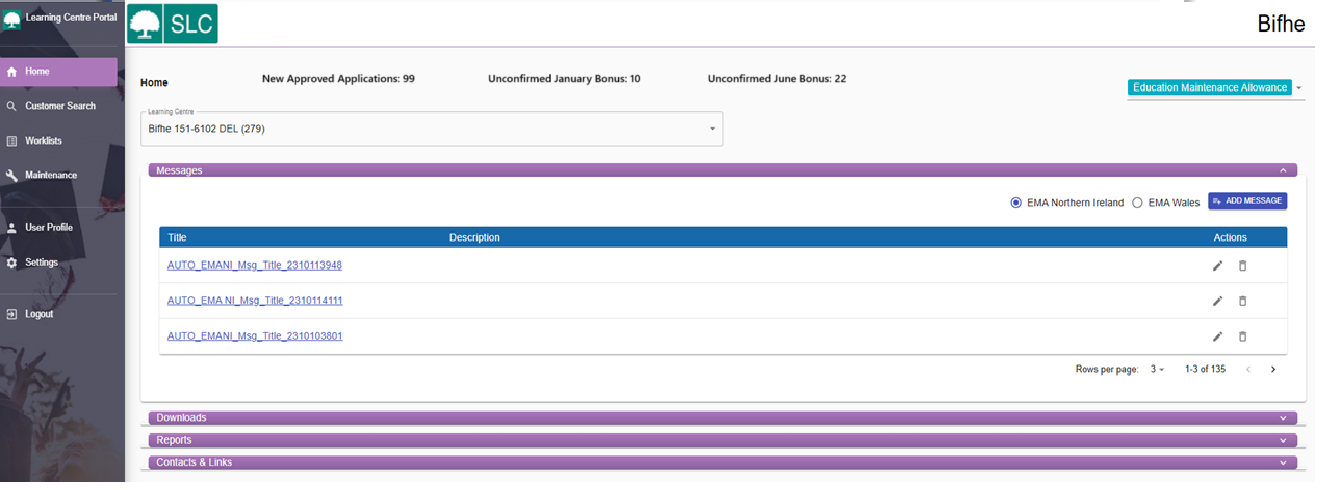
Messages
Select the Messages tab on the portal Home page to expand the message area. The messages shown here contain important information for all Learning Centres.

When we post a new message that needs your attention, a 'new' icon will appear next to it.

To read a message, select its title and the message will show in the description area.
Once you’ve read the message, you can archive it so it does not come up every time you sign into the portal. To do this, select the Archive checkbox and then select Save.
If you want to read it again later, select Archived messages.
Downloads
You can download some EMA related documents from the Learning Centre Portal. These include EMA Learning Agreement forms and payment guides.
- Go to the portal Home page and select Downloads.
- Open the Select a category dropdown and choose the category of the document you’re looking for.
- Open the Select a title dropdown and choose the document you need. A hyperlink to the document will appear under the dropdowns.
- Select the document hyperlink to download it.

Reports
In this section of the Learning Centre Portal, you can run reports for your Learning Centre.
- Go to the portal Home page and select Reports.
- Open the Category dropdown and choose the report category.
- Open the Title dropdown and choose the report you need. A hyperlink to the report will appear under the dropdowns.
- Select the hyperlink to download the report.

Service standard reports
You can use service standard reports to see how your Learning Centre is performing during the year.
You can also track your performance over the last few years and check how you’re doing compared to the national average.
- Go to the portal Home page and select Reports.
- Open the Category dropdown and choose Service Standard Reports.
- Open the Title dropdown and choose the report you need. A hyperlink to the report will appear under the dropdowns.
- Select the hyperlink to download the report.

Contacts and links
This area of the Learning Centre Portal Home page shows useful information and links.
For example, you can view:
- the contact information of our Partners Support Desk
- the contact information of your EMA Account Manager
- the postal address to send EMA application forms
Menu bar
The menu bar is on the left side of the Learning Centre Portal window. The links here will take you to all the areas of the portal:
- Home takes you to the portal Home page
- Customer Search lets you search for individual students
- Worklists lets you search for all your students and show an overview of outstanding administration actions for them
- Maintenance lets you update groups, holidays, users or profiles
- User Profile lets you see your user profile, including your username, access roles, Learning Centre name and much more
- Settings lets you change how you view the Learning Centre Portal
- Logout signs you out of the portal
There is more detailed information about these menu bar options in the following chapters of this guide.
If you want to minimise the menu bar, select the tree logo in its top left corner. To expand the menu bar, select the tree logo again.

Customer search
Customer search
The Customer Search area of the portal lets you find individual students and administer their accounts.

You can use it to view one student’s details at a time, rather than run a bulk search for all students. If you run a bulk search in another area of the portal, you can also open the Customer Search screen if you select a student’s surname in the bulk search results.
The Customer Search area has 4 tabs:
- view application details
- maintain learning agreement
- confirm attendance
- confirm bonus
Searching for a student here will not only retrieve their application information but populate all these tabs.
View Application Details tab
The View Application Details tab lets you find students who have submitted an EMA application. You can also see the status of their application here.

- To find a student, first select the relevant year from the Academic Year dropdown.
- Next, enter the student’s customer reference number or their first and last name and date of birth.
- Select Search and the system will bring up the relevant student’s record.

The View Application Details tab will show you the student’s application status, including if they are an auto rollover student. The Auto rollover indicator is active when an eligible student has been automatically rolled over into the new academic year. Typically, this will apply to second or third year students.
If you need to, you can add notes to a student’s account on this tab. You can also remove an individual student here. However, you should only remove students who have not yet signed their EMA Learning Agreement.
Where an application is currently at Missing Evidence, within the View Application of the Customer Search there will be a hyperlink enabled to allow you to see what evidence is outstanding.

Search criteria
Customer reference number
This field appears on every tab and brings up only one search result.
Surname and forenames
If you have more than one student with the same name, your search may bring up multiple results.
Academic year (AY)
You can view applications from a previous academic year, but you cannot submit confirmations for them.
Date of birth
You can search on a student’s date of birth alongside their surname and forename. Enter the date in DD/MM/YYYY format.
Total confirmations indicator
The Total confirmations indicator helps you to determine how many eligible weeks a student has remaining for EMA.
Follow these steps to see the indicator for an individual student.
- Go to the Customer Search area of the Learning Centre Portal.
- Run a search to find the student.
- Select the student’s surname to open their record.
- Select Attendance Confirmations.
- Look under Attendance Details to see how many confirmations you’ve submitted for this student.

If you need a full list of total confirmations for all students at your Learning Centre, go to the Worklists area of the portal and open the Attendance Worklist. You may need to scale down the page to see the Total confirmations indicator.
Maintain Learning Agreement tab
The Maintain Learning Agreement tab is for the maintenance of the EMA Learning Agreement.

You can use it to:
- review when Part 1 and Part 2 of the agreement have been signed
- update a new EMA Learning Agreement form
- open an existing EMA Learning Agreement form
- stop, suspend and reactivate EMA Learning Agreements
- assign students to groups
Updating EMA Learning Agreement details
- Sign into the Learning Centre Portal.
- Select Customer Search from the menu bar.
- Run a search to find the student whose agreement you want to update.
- Open the Maintain Learning Agreement tab and go to the Agreement Details section.
- Use the Yes and No radio buttons to confirm if the student has signed Part 1 or Part 2 of the EMA Learning Agreement or refused to do so.

Part 1 confirmation
Select Yes if the student has signed Part 1 of their EMA Learning Agreement.
Select No if the student has refused to sign it.
Do not select either if no action has been taken for Part 1 of the EMA Learning Agreement.
If you select No, the student will not appear in the Confirm Attendance tab.
If you select Yes, the Date field will show the date of confirming Part 1 of the agreement.
Part 2 confirmation
Select Yes if the student has signed Part 2 of their EMA Learning Agreement.
Select No if the student has refused to sign it.
Do not select either if no action has been taken for Part 2 of the EMA Learning Agreement.
If you selected Yes, enter the date Part 2 of the agreement was signed in the Date field.
Course start date
You must enter the student’s course start date before they sign their EMA Learning Agreement or you confirm their attendance.
The course start date determines when the student becomes eligible for EMA payments.
Once you’ve entered this date, you will not be able to change it.
Course type
You must also select the course that the student is studying from the Course Type dropdown. We’ve predefined the courses in this dropdown in consultation with Learning Centres in Northern Ireland.
Traineeship programme
From academic year 2021/22, the Northern Ireland Executive introduced the NI Traineeship programme. This will carry a level 2 qualification and be delivered through further education colleges.
You can select the traineeship option from the Course Type dropdown.

Recording consent to share
If a student gives you consent to discuss their EMA with their parent or guardian on their EMA Learning Agreement, you can record this on the Learning Agreement tab of the portal.
Select the Consent to share radio button when you confirm that the student has signed their EMA Learning Agreement.
Confirm Attendance tab
You can use the Confirm Attendance tab to process an individual student’s weekly attendance confirmations. You can also see their attendance history for previous weeks.
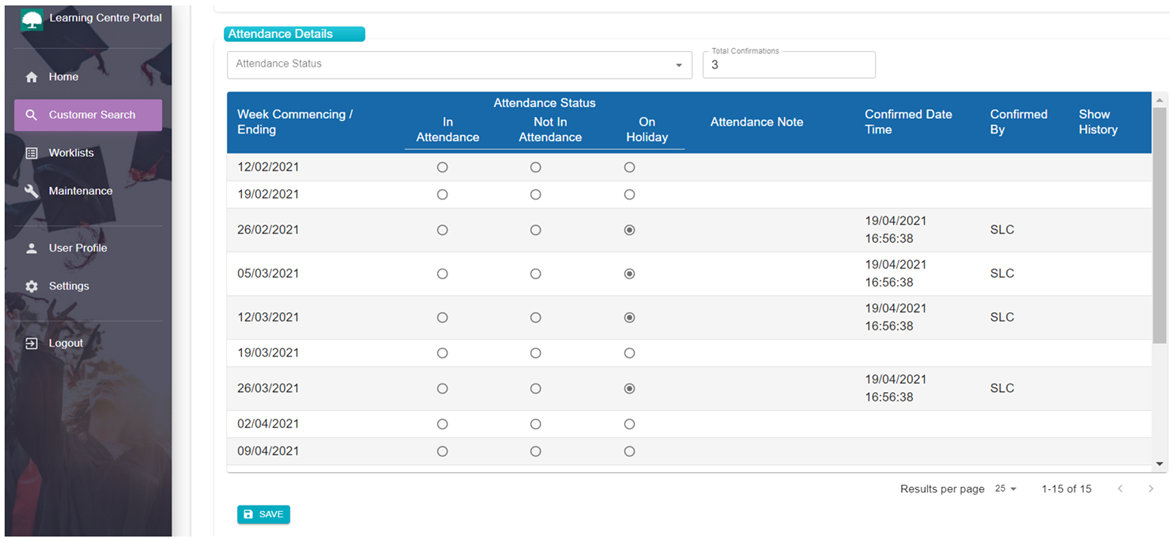
How to confirm attendance
- Sign into the Learning Centre Portal.
- Select Customer Search from the menu bar and run a search to find the relevant student.
- Open the Confirm Attendance tab.
- Select the In Attendance or Not In Attendance radio button for the relevant week.
- Select Save. This will open a popup that confirms your saved work.
If you confirm a student is in attendance during a holiday week, you’ll need to enter an attendance note. This will tell us why the student should receive EMA for that week. The options are:
- summer course
- work experience
- study class
- Prince’s Trust
- other
If you select other, you’ll need to enter a note to tell us why the student is in attendance.
SLC confirmations
You may occasionally see SLC in the Confirmed by column of the Confirm Attendance tab.
This means we’ve made the confirmation and you cannot override it on the portal.
If you need to change it, you’ll need to contact our Partners Support Desk who can do this for you.
Attendance confirmation deadlines
The deadline for submitting attendance confirmations for each week is at 5pm the following Wednesday.
If you miss the Wednesday deadline, payments may be delayed. This could cause questions from your students.
Confirm Bonus tab
You can use the Confirm Bonus tab to confirm bonuses for individual students.

- Sign into the Learning Centre Portal.
- Select Customer Search from the menu bar and run a search to find the relevant student.
- Open the Confirm Bonus tab.
- If the student has met their bonus objectives, select the Bonus Confirmed radio button. If the student has not met their bonus objectives, select the Bonus Disallowed radio button.
- Select Save to submit the bonus confirmation.
Worklists
Worklists
This area of the portal lets you review and update all applications, EMA Learning Agreement forms and attendances in one place. You can use 4 worklists to do this.

Application Worklist
This worklist lets you view the applications and their status. You can also use it for bulk removal of students.
EMA Learning Agreement Worklist
This worklist lets you view and update all EMA Learning Agreements. You can also use it to stop or suspend EMA Learning Agreements.
Attendance Worklist
This worklist lets you confirm attendance for all students.
Bonus Worklist
This worklist lets you confirm or disallow bonuses for students.
There is more information about each of these worklists in the next chapters of this guide.
Application Worklist
To view all applications, go to Worklists, open the Application Worklist tab and select Search.

You can also use the following search criteria to narrow down the results:
- customer reference number
- first and last name
- date of birth
- groups
- application status
- days since approval
You can view applications that are at the following stages:
- awaiting information
- missing evidence
- approved
- removed
- approved – outstanding Learning Agreement
Applications at the following stages are excluded:
- awaiting rejection
- rejected
The surnames in the search results are also hyperlinks. Selecting a surname will take you to the student’s record.
Your search may occasionally bring up a name you do not recognise as a student at your Learning Centre. It could be that the student has withdrawn and joined another Learning Centre without telling us. They might also have left another Learning Centre and enrolled at yours without you having been notified.
Missing Evidence hyperlink
Where an application is currently at Missing Evidence, within the ‘Application Worklist’ there will be a hyperlink enabled to allow you to see what evidence is outstanding.

When you select this link a pop up message will be displayed.

Application Worklist Export
An export function is also available from the application worklist screen. This means that you can export the application worklist to your own local systems.
Please note this export should always be used in accordance with the Data Sharing Agreement held between the Student Loans Company and Learning Centres. Each Party undertakes to the other that it shall comply, when applicable, with the obligations of a Controller under the provisions of the UK GDPR and undertakes that it will only process Personal Data as is necessary to perform its obligations under the Agreement in accordance with Data Protection Laws.
This means that you can only hold personal data for as long as you need for it to be used for its stated purpose, and the data from the new application worklist should be deleted as soon as the applications have been actioned as necessary.
Days since approval
You can use the Days since approval option to work out when the period of 10 working days to sign an EMA Learning Agreement will begin.
Students have 10 working days to sign their agreement. We begin counting this from the day their application is approved or the EMA academic year starts, whichever is later. We'll tell you the start date of the EMA academic year, usually in August, before the academic year begins. We’ve also added the Days since approval option to the portal to help you meet the 10 day service standard.
The number of days in the search results is also a hyperlink. Selecting this will take you straight to the student’s EMA Learning Agreement.
Auto Rollover
The Auto Rollover indicator shows when an eligible returning student has been automatically rolled over into the new academic year.
We will automatically roll over any eligible returning students, but you can remove and restore applications as needed.
Removing and restoring students
You can use the Application Worklist tab of the Learning Centre Portal to:
- remove students who are no longer at your Learning Centre
- restore students who have returned
Once you’ve removed a student, you will not need to confirm their EMA Learning Agreement or attendance. You should not remove students who have had an active EMA Learning Agreement.
Removing students
- Open the Application Worklist tab and run a search to bring up the students you want to remove.
- In the search results, select the Remove checkbox for any students you need to remove. This will activate the Remove button.
- Select the Remove button. This will open a popup asking you to confirm the removals.
- Select Confirm to remove the selected students or Cancel to return to the previous view.

Restoring students
- Open the Application Worklist tab.
- Open the Application Status dropdown and select Removed.
- Select Search to view a list of removed applications.
- Select the relevant student’s surname in the search results to open their application details.
- Select Restore and the system will put the student back onto your usual list of applications.

For example, you can use this option if a student originally decided to leave your Learning Centre to look for employment but then decided to return.
Once you’ve restored the student’s application, you can continue to confirm their EMA Learning Agreement and attendance as needed.
If you try to leave this screen without saving your work first, the system will show you a warning message.

Learning Agreement Worklist
You can use the Learning Agreement Worklist to:
- update EMA Learning Agreements
- stop, suspend or reinstate EMA Learning Agreements

To view all applications, go to Worklists, open the Learning Agreement Worklist tab and select Search. You can also use the following search criteria to narrow down the results:
- academic year
- customer reference number
- first and last name
- date of birth
- groups
- days since approval
- Learning Agreement status
- Part 1 confirmation
- Part 2 confirmation
The surnames in the search results are also hyperlinks. Selecting a surname will take you to the student’s record where you can make the necessary changes.

Learning Agreement Worklist Export
An export function is also available from the learning agreement worklist screen. This means that you can export the learning agreement worklist to your own local systems.
Please note this export should always be used in accordance with the Data Sharing Agreement held between the Student Loans Company and Learning Centres. Each Party undertakes to the other that it shall comply, when applicable, with the obligations of a Controller under the provisions of the UK GDPR and undertakes that it will only process Personal Data as is necessary to perform its obligations under the Agreement in accordance with Data Protection Laws.
This means that you can only hold personal data for as long as you need for it to be used for its stated purpose, and the data from the learning agreement worklist should be deleted as soon as the learning agreements have been actioned as necessary.
Suspending an EMA Learning Agreement
You should suspend a student’s EMA Learning Agreement if they’re away from your Learning Centre for an extended period. This could be due to long term sickness or a period of EMA ineligibility, such as a paid work placement.
You should also suspend a student if you’re not sure what has happened and whether they’ll be returning to your Learning Centre.
- Open the Learning Agreement Worklist and run a search to find the relevant student.
- Select the student’s surname in the search results to open their EMA Learning Agreement details.
- Select Suspend and enter the effective date.
- Select Save. This will open a popup where you can confirm the change.
The Learning Centre Portal will show who has suspended an EMA Learning Agreement. If it was someone from our Partners Support Desk, it will show as SLC. If it was one of your Learning Centre users, it will show as LC.
Reinstating an EMA Learning Agreement
You can reinstate a suspended EMA Learning Agreement if the student returns to your Learning Centre. For example, they might start attending again after recovering from long term sickness. If this happens, you must reinstate their EMA Learning Agreement before their EMA payments can start again.
- Open the Learning Agreement Worklist.
- In the Learning Agreement Status dropdown, select Suspended.
- Select Search to bring up a list of suspended EMA Learning Agreements.
- Select the student’s surname in the search results to open their EMA Learning Agreement details.
- Select Reinstate and enter the effective date.
- Select Save. This will open a popup where you can confirm the change.
Stopping an EMA Learning Agreement
You must specify a week ending date when you stop an EMA Learning Agreement. Once you’ve stopped an agreement, you cannot reactivate it.
You should only stop an EMA Learning Agreement if the student permanently withdraws from your Learning Centre. If you are not sure if the withdrawal is permanent, leave the record suspended until you can confirm this.
If you're stopping the agreement because the student has died, please tell our Partners Support Desk.
- Open the Learning Agreement Worklist and run a search to find the relevant student.
- Select the student’s surname in the search results to open their EMA Learning Agreement details.
- Select Stop and enter the date of the Friday of the week the student left.
- Select Save. This will open a popup where you can confirm the change.
The Learning Centre Portal will show who has stopped an EMA Learning Agreement. If it was someone from our Partners Support Desk, it will show as SLC. If it was one of your Learning Centre users, it will show as LC.
Attendance Worklist
You can use the Attendance Worklist to confirm attendance in bulk or individually. You can also confirm multiple attendances for a single student.

Confirming attendance for all students
- Go to Worklists and open the Attendance Worklist tab.
- Open the Week Commencing/Ending dropdown and select the week you want to update.
- Select Search. This will bring up a list of all the students who need an attendance confirmation for that week.
- If you want to confirm that all students were in attendance for that week, select Confirm All, then select Save.
If you’ve missed a holiday week, you can also update it here. To do this, select Holiday, then select Save.
Confirming attendance individually
- Go to Worklists and open the Attendance Worklist tab.
- Open the Week Commencing/Ending dropdown and select the week you want to update.
- Select Search. This will bring up a list of all the students who need an attendance confirmation for that week.
- Go to the Attendance Status column and select the relevant radio button for each student. The options are In Attendance, Not In Attendance and On Holiday.
- Once you’ve selected the relevant radio buttons for all students, select Save.
Confirming multiple attendances for a single student
- Go to Worklists and open the Attendance Worklist tab.
- Open the Week Commencing/Ending dropdown and select the first week you want to update.
- Select Search. This will bring up a list of all the students who need an attendance confirmation for that week.
- Select the relevant student’s surname. This will take you to their account where you can select an attendance option for each week.

Reviewing attendances in bulk
An export function is also available from the learning agreement worklist screen. This means that you can export the learning agreement worklist to your own local systems.
You should always use this export in accordance with the Data Sharing Agreement held between the Student Loans Company and Learning Centres. Each party undertakes to the other that it shall comply, when applicable, with the obligations of a Controller under the provisions of the UK GDPR and undertakes that it will only process Personal Data as is necessary to perform its obligations under the Agreement in accordance with Data Protection Laws.
This means that you can only hold personal data for as long as you need for it to be used for its stated purpose, and you should always delete the data from the learning agreement worklist as soon as you have used it as needed.
Attendance options
In attendance means that the student has met your school or college’s attendance rules, including any authorised absences. Students are entitled to EMA while they're in learning which can include full time study, study leave and blended learning.
Not in attendance means that the student did not meet your school or college’s attendance rules, including unauthorised absences.
On holiday means that your Learning Centre is officially closed for an extended period. This includes half term weeks, Easter and Christmas holidays and the summer break. You can also set this in advance using the Holidays tab under the Maintenance section of the portal.
You should not use the holiday option for weeks that contain staff training days or bank holidays, even if your Learning Centre is officially closed. For one off closures during the week, the students are counted as in attendance.
Attendance confirmation requirements
When you confirm attendance, you need to:
- confirm weekly by 5pm on Wednesday
- confirm both In Attendance and Not In Attendance or On Holiday
- tell students if they are not going to be paid
- be consistent with your Learning Centre’s attendance policy
- be consistent in what counts as authorised and unauthorised absence for EMA recipients and other students
Unconfirmed weeks indicator
The Unconfirmed weeks indicator appears on the Attendance Worklist if you still have students with outstanding attendance confirmations. You should always select it to see the details, then update and save attendance for any weeks that show.
Once all attendance confirmations are up to date, this box will disappear until the next Friday.

Total confirmations indicator
The Total column on the Attendance Worklist tab helps you pick out students who are reaching their 117 maximum payments.
Select this column to sort the students according to the number of their total attendance confirmations, from lowest to highest. Select it again to sort from highest to lowest. Select it for a third time and the system will remove the sorting.
You can then select the other columns to sort them from highest to lowest value or A to Z.

Bonus Worklist
You can use the Bonus Worklist tab to allow or disallow bonus payments to students.
Bonuses are paid in January and June. You can edit the data in this tab for 6 weeks before the bonus date. At all other times this tab is read only.
If notes have been made for the student in the portal, you will see them on this page.

How to confirm bonuses
- Go to Worklists and open the Bonus Worklist tab. Or select the relevant Unconfirmed Bonus link from the homepage.
- Select Search and choose the correct bonus period. This will bring up a list of your students.
- Go to the Bonus Status column and select the appropriate radio button for each student.
The options are Bonus Disallowed and Bonus Confirmed. If you have not made a decision for the student, do not select either but move on to the next student on the list.
Once you’ve selected Bonus Confirmed or Bonus Disallowed, you cannot return the selection to blank. You can change from one option to the other, but you should only do this before the payment is made. - When you’ve reviewed all students on the list, select Save.
Maintenance
Maintenance
You can use the Maintenance area of the Learning Centre Portal to view and update information about your Learning Centre's:
- users
- profiles
- groups
- holidays
There is more information about each of these in the following chapters of this guide.

Users tab
You can use the Users tab in the Maintenance area of the portal to:
- create new user accounts
- view existing user accounts
- expire old user accounts
The next chapters of this guide will tell you more about user roles and maintenance.

User access roles
EMA Administrator
Users with this role can access all sections and tabs on the Learning Centre Portal. They can:
- view applications and EMA Learning Agreements
- confirm attendance
- confirm bonuses
- maintain groups
- maintain holidays
- maintain users
EMA User
Users with this role can access limited tabs on the Learning Centre Portal. They can:
- view applications and EMA Learning Agreements
- confirm attendance
- confirm bonuses
Creating and expiring user accounts
How to create a new user account
- Go to the Maintenance area of the Learning Centre Portal and open the Users tab.
- Select Create new.
- Enter the new user’s details: First name, Surname, Email and Telephone number.
- Select the appropriate checkbox to allocate a user access role. This is usually Administrator.
- Select Continue. This will open a confirmation screen where you can review the details.
- If all the details are correct, select Submit to finish creating the user.
The system will then email the new user their username and a temporary password. The user will appear on the list of users at your Learning Centre.
You can also choose to copy the new user’s details to the Profiles tab. This will add the new user to our mailing list so they can start receiving emails from your EMA Account Manager.
How to expire an old user account
You should expire any old accounts as soon as the user no longer needs access to the portal.
- Go to the Maintenance area of the Learning Centre Portal and open the Users tab.
- Find the account you need to expire and select Edit.
- Select Expire account.
Profiles tab
Your Learning Centre should have at least 2 users listed on the Profiles tab. These should be your main users of the Learning Centre Portal.

If you need to, you can add more users. To do this, select Additional Contact and Add Contact.
If you need to check or change an existing user’s details, select Edit.

Please make sure the profiles here are up to date with the correct contact information. Only users who have their contact details on this tab will receive our emails about the EMA scheme.
You can also update the address and telephone number of your Learning Centre on this tab. It is important that you keep these up to date so we can deliver printed materials to you, such as application packs and pre-launch materials.
Groups tab
You can use the Groups tab to create, amend or delete groups. Setting up groups can be useful if your Learning Centre has more than one campus, for example.
You’ll need EMA Administrator access to use this tab.

To create a new group, enter a group name and description, then select Add. Once you’ve set up a group, you can assign students to it.
If you have any groups that are no longer in use, you can archive them. To do this, select the checkbox in the Archive column, then select Save.
If you want to delete a group altogether, select the checkbox in the Delete column, then select Save.
Holidays tab
If your Learning Centre is closed to students for 4 or more days in a week, this is counted as a holiday week. You must enter your holiday weeks on the Holidays tab of the Learning Centre Portal.
You need to have EMA Administrator access to use the Holidays tab.
You must add all your holidays, including summer holidays, for the upcoming academic year before it starts in September. You can add holidays from May. The holidays must be at least 8 weeks in total.

How to enter your holidays
- Go to the Maintenance section of the Learning Centre Portal and open the Holidays tab.
- Select the correct year from the Academic Year dropdown.
- Select the Holiday checkbox for each week that is a holiday week.
- Select Save.
You can no longer enter holiday weeks for groups. We’ve replaced this option with just the academic year. This means you only need to update holidays once for each year.
You can override the minimum requirement of 8 weeks' holidays at student level if there are exceptions. For example, this might apply to students whose course includes placements during holidays.
User profile and settings
User profile
The User profile section of the Learning Centre Portal shows your user details. These include:
- your username
- the scheme you administer
- your surname
- your forenames
- your system access role

Settings
You can use the Settings section of the Learning Centre Portal to change the colour of the following portal areas:
- header
- accordions
- menu
- menu background
You can also choose whether to display an image in the menu background, minimise the menu bar and change the font size.
There is also a button to restore default settings.
